
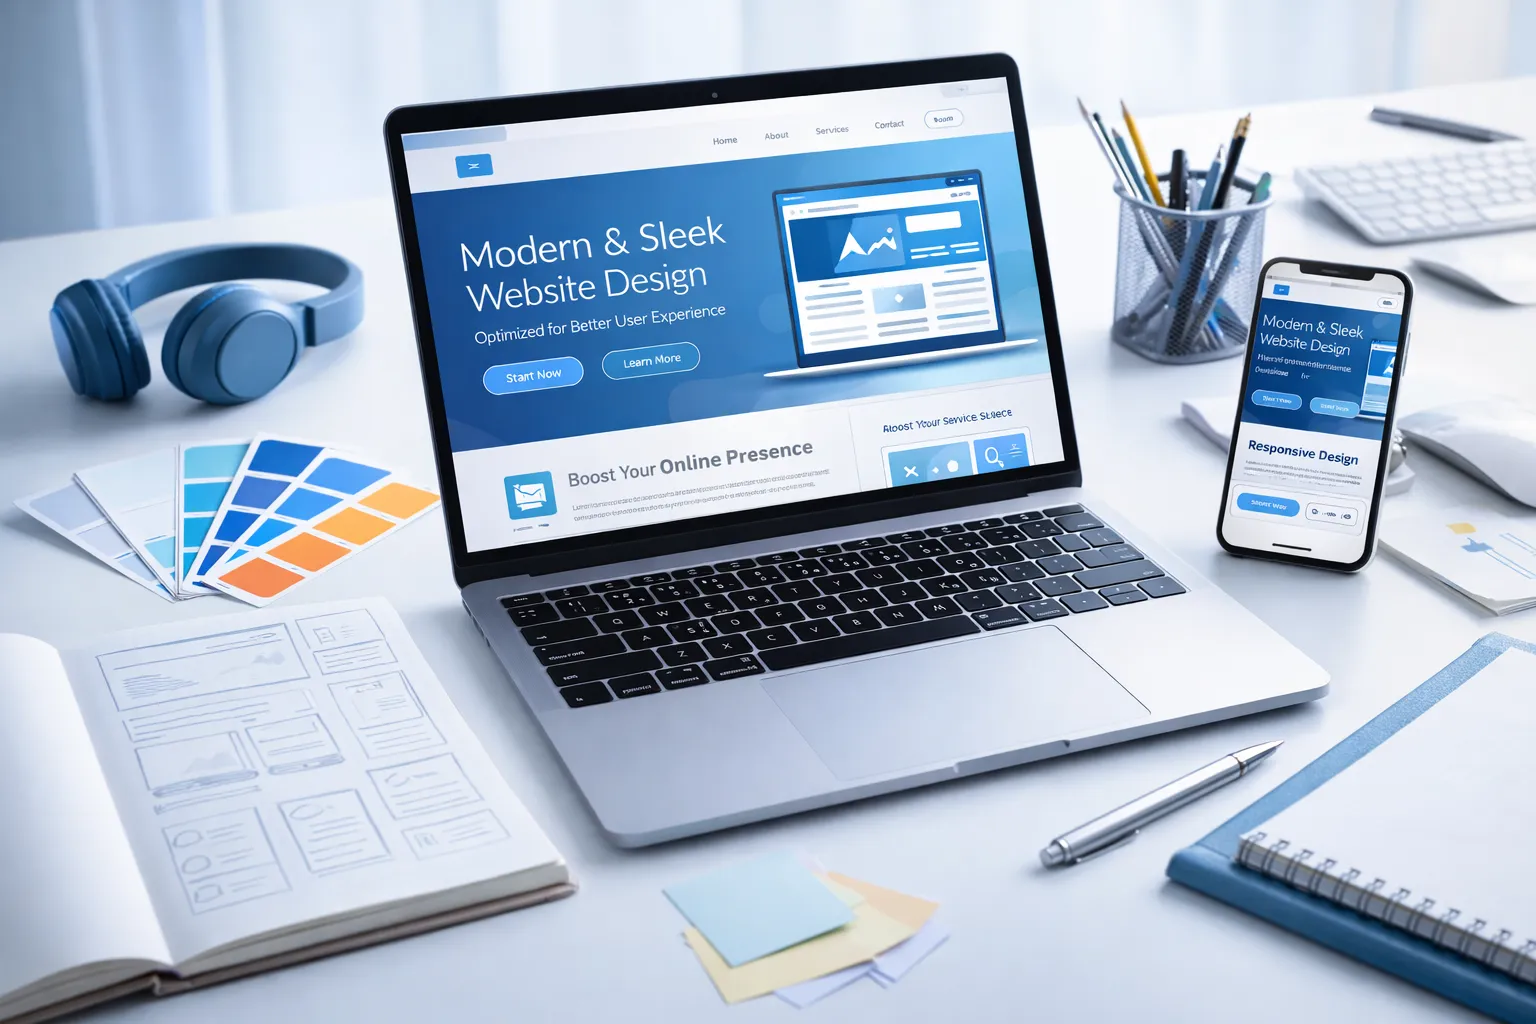
Redesigning your website is like giving it a complete transformation. A well-executed redesign can boost traffic, improve user retention, and generate more leads. However, jumping in without a solid plan can lead to SEO disasters, broken functionality, and wasted resources.
According to recent industry data, 73% of websites lose organic traffic after a redesign due to poor planning. That’s why having a comprehensive website redesign checklist is critical for success.
This guide walks you through every essential step—from initial research and planning to post-launch optimization. Whether you’re a business owner, marketer, or working with a web design agency, this checklist will ensure your redesign delivers results without the common pitfalls.
Pre-Redesign Assessment

1. Define Clear, Measurable Goals
Before touching a single design element, establish exactly what you want to achieve with your website redesign.
Common redesign goals include:
- Increase organic traffic by a specific percentage
- Improve conversion rates on key landing pages
- Reduce bounce rate and increase time on site
- Enhance mobile user experience
- Support a rebrand or new business direction
- Modernize outdated design aesthetics
- Improve site speed and performance
Write down your specific goals and define the key performance indicators (KPIs) you’ll use to measure success. For example: “Increase lead generation by 40% within 6 months of launch” or “Improve mobile page speed to under 3 seconds.”
Setting SMART goals (Specific, Measurable, Achievable, Relevant, Time-bound) ensures you can track ROI and prove the redesign’s value to stakeholders.
2. Conduct a Comprehensive Website Audit
A thorough audit reveals what’s working and what needs improvement. This data becomes your baseline for measuring post-redesign success.
Use Google Analytics to analyze:
- Traffic sources and top-performing channels
- Pages with the highest and lowest traffic
- Bounce rates by page and traffic source
- Average session duration
- Conversion paths and drop-off points
- User demographics and behavior patterns
Use Google Search Console to identify:
- Top-performing keywords and pages
- Pages with indexing issues
- Mobile usability problems
- Current search rankings
- Click-through rates from search results
Additionally, use tools like:
- Heatmaps (Hotjar, Crazy Egg) to see where users click and scroll
- Site speed tools (Google PageSpeed Insights, GTmetrix) to measure performance
- SEO audit tools (Screaming Frog, SEMrush, Ahrefs) to find technical issues
This audit helps you identify which pages are generating value and must be preserved or improved in your redesign.
3. Perform Competitor Analysis
Understanding your competitive landscape prevents you from falling behind and reveals opportunities for differentiation.
Analyze your top 5-10 competitors’ websites for:
- Design aesthetics and modern trends they’re using
- Site structure and navigation patterns
- Content types and topics they cover
- User experience features (chatbots, personalization, etc.)
- Mobile responsiveness and functionality
- Page speed and technical performance
- Call-to-action placement and messaging
- SEO strategies and ranking keywords
Use tools like SimilarWeb, SEMrush, or Ahrefs to uncover their traffic sources, top pages, and backlink profiles. Note what works well and what gaps you can exploit to create a competitive advantage.
4. Gather User Research and Feedback
Your website exists to serve your users. Their input is invaluable for creating a redesign that actually solves their problems.
Methods for collecting user feedback:
- Surveys: Send to existing customers asking about their experience
- User interviews: Conduct 1-on-1 conversations with representative users
- On-site feedback tools: Use tools like Hotjar or UserTesting
- Customer support data: Review common questions and complaints
- Social media listening: Monitor mentions and discussions about your brand
- Usability testing: Watch users navigate your current site and note pain points
Create user personas based on this research to guide design decisions. Understanding your audience’s needs, preferences, and frustrations ensures your redesign serves them effectively.
5. Create a Complete Content Inventory
A content inventory is a comprehensive list of every page, post, and asset on your current website. This is critical for SEO preservation.
Create a spreadsheet documenting:
- Every URL on your site
- Page titles and meta descriptions
- Current traffic volume (monthly visits)
- Conversion rates (if applicable)
- Number of backlinks pointing to each page
- Keyword rankings for each page
- Content status: Keep, Update, Merge, Redirect, or Delete
This inventory prevents you from accidentally deleting high-value content and helps you plan your URL structure and redirect strategy. Pages with strong backlinks or high traffic must be handled carefully to preserve SEO value.
Planning & Strategy Phase

6. Establish Budget and Timeline
Website redesigns vary dramatically in cost and time depending on scope, complexity, and who executes the work.
Typical cost ranges:
- DIY with website builder: $100-$500 (templates, premium features)
- Freelancer: $2,000-$15,000 (depending on experience and scope)
- Small agency: $10,000-$50,000 (professional design and development)
- Enterprise agency: $50,000-$250,000+ (large, complex sites with custom features)
Budget should account for:
- Design and development work
- Content creation or copywriting
- Photography or custom graphics
- SEO consulting and implementation
- Testing and quality assurance
- Training and documentation
- Ongoing maintenance
- Contingency fund (add 15-20% buffer)
Realistic timelines:
- Small business site (10-20 pages): 2-4 months
- Medium business site (50-100 pages): 4-6 months
- Large enterprise site (200+ pages): 6-12 months
Create a detailed project timeline with milestones, deliverables, and accountability checkpoints to keep the project on track.
7. Decide: DIY, Freelancer, or Agency?
This decision depends on your budget, timeline, technical expertise, and project complexity.
DIY with website builders (Wix, Squarespace, WordPress):
- Pros: Most affordable, full creative control, quick setup
- Cons: Requires time investment, limited customization, may lack advanced features
- Best for: Small businesses, portfolios, simple sites with limited functionality
Hire a freelancer:
- Pros: More affordable than agencies, personalized attention, flexible
- Cons: Limited capacity, may lack specialized skills, depends on one person
- Best for: Medium-sized projects with moderate complexity
Hire an agency:
- Pros: Full team expertise, proven processes, handles all aspects, ongoing support
- Cons: Most expensive option, may have longer timelines, less direct control
- Best for: Large projects, complex requirements, businesses needing comprehensive strategy
Evaluate your internal resources, technical capabilities, and business priorities to make the right choice. Many businesses benefit from a hybrid approach—using a platform like WordPress with professional design and development support.
8. Choose Your Website Platform and Tools
Selecting the right platform is foundational to your website’s long-term success.
Popular website platforms:
- WordPress: Most flexible, 40%+ of all websites, extensive plugins, requires some technical knowledge
- Shopify: Best for e-commerce, easy to use, built-in payment processing
- Wix/Squarespace: Easiest for beginners, beautiful templates, limited customization
- Webflow: Designer-friendly, powerful customization, steeper learning curve
- Custom development: Maximum flexibility, highest cost, requires ongoing developer support
Essential tools you’ll need:
- Analytics: Google Analytics, Google Search Console
- SEO: Yoast SEO, Rank Math, SEMrush, Ahrefs
- Design: Figma, Adobe XD, Sketch, Canva
- Project management: Asana, Trello, Monday.com
- Testing: BrowserStack, Hotjar, UserTesting
- Speed optimization: WP Rocket, Cloudflare, ImageOptim
Choose tools that integrate well with your chosen platform and support your specific needs.
9. Design Your Sitemap and Information Architecture
Your sitemap defines how all pages connect and how users navigate through your site. A logical structure improves user experience and SEO.
Steps to create an effective sitemap:
- Start with your main navigation categories (usually 5-7 top-level items)
- Group related content under appropriate categories
- Ensure every page is reachable within 3-4 clicks from the homepage
- Plan clear conversion paths toward key actions
- Consider both user needs and search engine crawling
- Create a visual hierarchy showing parent-child relationships
Navigation best practices:
- Keep main navigation simple and intuitive
- Use descriptive labels (avoid jargon)
- Include a search function for larger sites
- Add breadcrumb navigation for easier wayfinding
- Ensure your logo links back to the homepage
- Plan mobile navigation carefully (hamburger menus, mega menus)
A well-planned sitemap serves as your blueprint throughout design and development, keeping everyone aligned on the final structure.
10. Create Wireframes and Prototypes
Wireframes are low-fidelity sketches that map out page layouts without detailed design. They help you plan functionality and user flow before investing in visual design.
Wireframing process:
- Sketch basic layouts for key page types (homepage, product/service pages, blog posts, contact)
- Define content zones and their priority
- Plan call-to-action placement
- Map user journeys through the site
- Get stakeholder feedback and iterate
Use tools like Figma, Adobe XD, Sketch, or even a simple pen and paper. Once wireframes are approved, create higher-fidelity mockups and clickable prototypes to test user interactions before development begins.
Prototyping helps catch usability issues early when changes are cheap and easy, rather than after expensive Shopify Development work is complete.
Design & User Experience

11. Implement Mobile-First Design
With over 60% of web traffic coming from mobile devices, mobile-first design isn’t optional—it’s essential.
Mobile-first approach means:
- Designing for small screens first, then scaling up to desktop
- Ensuring all functionality works on touchscreens
- Optimizing images and assets for mobile data speeds
- Making buttons and links easy to tap (minimum 44×44 pixels)
- Using legible font sizes without zooming (minimum 16px body text)
- Simplifying navigation for smaller screens
Test your mobile experience:
- Use real devices, not just browser emulators
- Test on both iOS and Android
- Check various screen sizes (phones and tablets)
- Verify forms work easily on mobile keyboards
- Ensure fast loading on 3G/4G connections
Google uses mobile-first indexing, meaning the mobile version of your site determines your search rankings. A poor mobile experience directly hurts your SEO and alienates the majority of users.
12. Ensure Web Accessibility (WCAG Compliance)
Web accessibility ensures people with disabilities can use your website. It’s not just ethical—it’s increasingly required by law and improves usability for everyone.
Key WCAG 2.1 AA requirements:
Visual accessibility:
- Sufficient color contrast (4.5:1 for normal text, 3:1 for large text)
- Don’t rely solely on color to convey information
- Provide text alternatives (alt text) for all images
- Ensure text can be resized up to 200% without breaking layout
Keyboard accessibility:
- All functionality accessible via keyboard alone
- Visible focus indicators on interactive elements
- Logical tab order through page content
- Skip navigation links to main content
Content accessibility:
- Use proper heading hierarchy (H1, H2, H3)
- Write descriptive link text (not “click here”)
- Provide captions for videos
- Use ARIA labels where appropriate
- Ensure forms have clear labels
Use tools like WAVE, axe DevTools, or Lighthouse to audit accessibility. Making your site accessible expands your audience, improves SEO, reduces legal risk, and simply makes the web better for everyone.
13. Apply Design Best Practices
Professional design combines aesthetics with functionality. Follow proven principles to create a visually appealing and effective website.
Visual hierarchy: Use size, color, contrast, and spacing to guide users’ attention to the most important elements first. Your primary call-to-action should be the most prominent element on key pages.
Consistency: Maintain consistent fonts, colors, button styles, spacing, and design patterns throughout your site. Consistency builds familiarity and trust.
White space: Don’t fear empty space. Adequate white space (negative space) improves readability, creates visual breathing room, and makes designs feel premium and uncluttered.
Typography: Limit to 2-3 complementary fonts. Use sufficient line height (1.5-1.7) and appropriate font sizes. Ensure excellent readability across all devices.
Color psychology: Choose colors that reflect your brand personality and evoke appropriate emotions. Use a primary color (brand identity), secondary color (accents), and neutral colors (backgrounds, text).
Visual balance: Distribute visual weight evenly across the page. This can be symmetrical (formal, traditional) or asymmetrical (dynamic, modern), but should always feel intentional and stable.
F-pattern and Z-pattern: Users typically scan pages in predictable patterns. Place your most important content along these eye-tracking paths—the F-pattern for text-heavy pages, Z-pattern for simple landing pages.
14. Optimize for Conversion (CRO)
Every design decision should support your business goals. Conversion Rate Optimization ensures your redesign drives meaningful results.
CRO best practices:
Clear value proposition: Within 5 seconds of landing on your homepage, visitors should understand what you offer and why it matters to them. Use compelling headlines and supporting subheadlines.
Strategic CTA placement:
- Place primary CTAs above the fold
- Use contrasting colors that draw attention
- Write action-oriented copy (“Get Started,” not “Submit”)
- Include multiple CTAs on longer pages
- Make CTAs large enough to be easily clicked
Trust signals:
- Display customer testimonials and reviews
- Show logos of well-known clients or partners
- Include security badges and certifications
- Add professional photos (not stock images)
- Highlight awards, press mentions, or statistics
Reduce friction:
- Simplify forms (only ask for essential information)
- Offer guest checkout for e-commerce
- Provide multiple contact methods
- Use progress indicators for multi-step processes
- Pre-fill known information when possible
Social proof:
- Show live customer activity (“23 people are viewing this product”)
- Display number of customers, projects completed, or years in business
- Feature case studies with specific results
- Highlight recent reviews or ratings
A conversion-focused redesign balances aesthetics with strategic elements that guide users toward desired actions.
15. Develop Your Content Strategy
Content is what attracts visitors, engages them, and convinces them to act. Your redesign is an opportunity to refresh and optimize all content.
Content audit and optimization:
- Update outdated information and statistics
- Rewrite weak or thin content with more value
- Ensure consistent brand voice and tone
- Break up long paragraphs for readability
- Add descriptive subheadings every 200-300 words
- Include relevant internal links to related content
Keyword optimization: Conduct fresh keyword research to identify terms your target audience searches for. Naturally incorporate these keywords into:
- Page titles and meta descriptions
- H1 and H2 headings
- First paragraph of body content
- Image alt text
- URL slugs
Content formats: Don’t rely solely on text. Incorporate diverse content types:
- Videos (product demos, explainer videos, testimonials)
- Infographics and data visualizations
- Downloadable resources (guides, templates, checklists)
- Interactive tools (calculators, quizzes, configurators)
- Podcasts or audio content
- Case studies with real results
Blog strategy: If you have a blog, plan how it fits into your redesign. Improve category organization, add filtering options, enhance the reading experience, and create a content calendar for ongoing publishing.
Quality content establishes authority, improves SEO, and gives visitors a reason to return to your site.
16. Define Your Visual Brand Identity
Your website should be an authentic expression of your brand. Ensure all visual elements align with your brand identity.
Core brand elements:
- Logo: Ensure you have all necessary file formats and variations (full color, monochrome, icon-only)
- Color palette: Define primary, secondary, and accent colors with exact hex codes
- Typography: Choose brand fonts for headings and body text
- Photography style: Determine the look and feel of images (bright and airy, dark and moody, minimalist, etc.)
- Iconography: Select or create consistent icon styles
- Voice and tone: Define how you communicate (professional, friendly, authoritative, playful)
If you’re undergoing a rebrand, your website redesign should debut the new identity. If your brand is established, ensure the redesign strengthens recognition rather than confusing existing customers.
Create a brand style guide documenting all these elements for consistent application across your website and other marketing materials.
Technical SEO Implementation

17. Plan and Implement 301 Redirects
This is the single most critical step for preserving SEO value during a redesign. Failing to implement proper redirects can devastate your organic traffic.
Why redirects matter: When you change URLs, search engines and users following old links will encounter 404 errors unless you redirect them to the new location. Without redirects, you lose:
- Search engine rankings for those pages
- Traffic from existing links
- Value from backlinks pointing to old URLs
- Customer trust and user experience
Redirect mapping process:
- Export all current URLs from your site
- Map each old URL to its corresponding new URL in a spreadsheet
- For pages being consolidated, redirect multiple old URLs to one new URL
- For deleted content without a direct equivalent, redirect to the most relevant related page
- Implement 301 redirects (permanent redirects, not 302 temporary redirects)
- Test every redirect before launch
Redirect implementation:
- Use server-side 301 redirects (not JavaScript or meta refresh)
- Implement via .htaccess file (Apache), web.config (IIS), or hosting control panel
- Consider using plugins like Redirection (WordPress) for easier management
- Avoid redirect chains (A→B→C); redirect directly from A→C
Test all redirects thoroughly using tools like Screaming Frog or checking manually in your browser before going live.
18. Optimize Technical SEO Elements
Beyond redirects, numerous technical SEO factors affect your search visibility and need attention during redesign.
URL structure:
- Keep URLs short, descriptive, and keyword-rich
- Use hyphens to separate words (not underscores)
- Avoid unnecessary parameters and session IDs
- Use lowercase letters
- Create logical hierarchy (example.com/category/product-name)
XML sitemap:
- Generate a fresh XML sitemap including all important pages
- Submit to Google Search Console and Bing Webmaster Tools
- Update regularly when adding new content
- Exclude low-value pages (admin, duplicate content)
Robots.txt:
- Configure to allow crawling of important content
- Block crawling of sensitive or duplicate pages
- Test using Google Search Console’s robots.txt tester
Structured data (Schema markup): Implement appropriate schema types to help search engines understand your content:
- Organization/LocalBusiness schema
- Product schema (for e-commerce)
- Article/BlogPosting schema
- Review/Rating schema
- FAQ schema
- Breadcrumb schema
Meta tags optimization:
- Write unique, compelling meta titles (50-60 characters)
- Create persuasive meta descriptions (150-160 characters)
- Use proper heading hierarchy (one H1 per page, logical H2-H6 structure)
- Include descriptive alt text for all images
- Set canonical tags to prevent duplicate content issues
Page speed optimization:
- Compress and optimize images (use WebP format)
- Minimize CSS, JavaScript, and HTML
- Enable browser caching
- Use a content delivery network (CDN)
- Implement lazy loading for images and videos
- Reduce server response time
Core Web Vitals: Focus on Google’s key performance metrics:
- Largest Contentful Paint (LCP): Under 2.5 seconds
- First Input Delay (FID): Under 100 milliseconds
- Cumulative Layout Shift (CLS): Under 0.1
Use Google PageSpeed Insights and Search Console to monitor and improve these metrics.
19. Implement Security Best Practices
Website security protects your business and customers while building trust and supporting SEO rankings.
Essential security measures:
SSL certificate (HTTPS):
- Install an SSL certificate to enable HTTPS encryption
- All modern browsers flag non-HTTPS sites as “Not Secure”
- Google uses HTTPS as a ranking signal
- Essential for e-commerce and any site collecting personal information
Regular backups:
- Implement automated daily or weekly backups
- Store backups in multiple locations (local and cloud)
- Test backup restoration to ensure they actually work
- Keep backups for at least 30 days
Software updates:
- Keep your CMS, plugins, themes, and server software updated
- Enable automatic security updates when possible
- Remove unused plugins and themes (they create security vulnerabilities)
Strong authentication:
- Use strong, unique passwords
- Implement two-factor authentication (2FA)
- Limit login attempts to prevent brute force attacks
- Change default admin URLs if possible
Additional security layers:
- Install a web application firewall (WAF)
- Use security plugins like Wordfence or Sucuri
- Implement CAPTCHA on forms to prevent spam
- Regularly scan for malware and vulnerabilities
- Set appropriate file permissions
Security breaches damage your reputation, hurt customer trust, and can result in Google blacklisting your site. Prioritize security from the beginning rather than reacting after an incident.
20. Set Up Analytics and Tracking
You can’t improve what you don’t measure. Proper analytics setup is essential for evaluating your redesign’s success.
Google Analytics setup:
- Create a fresh property or maintain existing for historical comparison
- Set up goals for key conversions (form submissions, purchases, downloads)
- Configure e-commerce tracking if applicable
- Create custom dashboards for quick insights
- Set up event tracking for important interactions (video plays, CTA clicks, scroll depth)
Google Search Console:
- Verify ownership of your new site
- Submit your XML sitemap
- Monitor indexing status and coverage issues
- Track search queries and rankings
- Identify and fix mobile usability problems
Additional tracking:
- Set up heatmaps (Hotjar, Crazy Egg) to understand user behavior
- Implement call tracking for phone conversions
- Add Facebook Pixel if using Facebook ads
- Install Google Tag Manager for easier tag management
Create a measurement plan documenting exactly what you’ll track and how you’ll define success. This baseline allows you to measure the redesign’s impact accurately.
Testing & Quality Assurance

21. Comprehensive Pre-Launch Testing
Never launch without thorough testing. Catching issues before users encounter them saves your reputation and prevents lost business.
Functionality testing:
- Click every button, link, and navigation item
- Submit all forms with various inputs (valid and invalid)
- Test search functionality
- Verify all downloads work
- Check all videos and embedded media play correctly
- Test user account features (registration, login, password reset)
- Complete full e-commerce checkout process
Cross-browser testing: Test on multiple browsers and versions:
- Chrome (most popular)
- Safari (especially for Mac/iOS users)
- Firefox
- Edge
- Mobile browsers (Chrome mobile, Safari mobile)
Use tools like BrowserStack or CrossBrowserTesting to test on browsers and devices you don’t have physical access to.
Device and screen size testing:
- Desktop (various screen sizes)
- Tablets (iPad, Android tablets, both portrait and landscape)
- Smartphones (various sizes from compact to large)
- Test on actual devices when possible, not just emulators
Performance testing:
- Run PageSpeed Insights on key pages
- Test on slower 3G/4G connections
- Verify the site remains functional under load
- Check load times for pages with lots of images or interactive elements
Accessibility testing:
- Run automated tests (WAVE, axe, Lighthouse)
- Test keyboard-only navigation
- Test with screen readers (NVDA, JAWS, VoiceOver)
- Verify sufficient color contrast
SEO technical testing:
- Verify all meta titles and descriptions are present
- Check all redirects work correctly
- Ensure XML sitemap is accurate
- Test robots.txt
- Verify structured data using Google’s Rich Results Test
- Check for broken links using Screaming Frog
22. User Acceptance Testing (UAT)
Before final launch, have real users test your site. Fresh eyes catch issues you’ve become blind to through familiarity.
UAT process:
- Recruit 5-10 representative users from your target audience
- Provide specific tasks to complete (find a product, contact support, etc.)
- Observe them using the site (remote or in-person)
- Ask them to think aloud about their experience
- Collect feedback through surveys or interviews
- Document issues and prioritize fixes
User testing often reveals navigation confusion, unclear messaging, or technical issues that seemed fine to the development team. This feedback is invaluable for refinement before public launch.
23. Create a Pre-Launch Checklist
Use a detailed checklist to ensure nothing falls through the cracks before going live.
Essential pre-launch items:
- All content proofread and approved
- All images optimized and include alt text
- All links tested (internal and external)
- All forms tested and connected to proper email addresses
- Contact information accurate and up-to-date
- Privacy policy and terms of service updated
- Cookie consent banner configured (if required)
- SSL certificate installed and HTTPS working
- 301 redirects implemented and tested
- XML sitemap generated and submitted
- Robots.txt configured correctly
- Google Analytics tracking code installed
- Google Search Console verified
- Favicon appears correctly
- Social media meta tags configured (Open Graph, Twitter Cards)
- 404 error page designed and functional
- Remove “under construction” or staging banners
- Disable development/staging site indexing
- Test site on multiple devices and browsers
- Backup old site completely
- Schedule launch during low-traffic period
- Notify team of launch timeline
- Prepare rollback plan if critical issues arise
Systematically work through this checklist in the days leading up to launch to ensure a smooth transition.
Launch & Post-Launch Optimization

24. Backup Your Old Website
Before launching your redesign, create a complete backup of your existing site. This is your safety net if anything goes wrong.
What to backup:
- All website files and database
- All images and media files
- Configuration files and settings
- Email accounts and settings if hosted with your site
- Plugin/extension settings
Store backups in multiple secure locations (local drive, cloud storage, external hard drive). Verify the backup is complete and can be restored successfully. This backup allows you to quickly revert to the old site if critical issues emerge during launch.
25. Execute Your Launch Plan
Launch day should be carefully orchestrated to minimize downtime and catch issues quickly.
Launch process:
- Schedule strategically: Launch during your lowest-traffic period (often late evening/early morning) to minimize disruption
- Announce maintenance window: Notify users in advance if any downtime is expected
- Go live: Deploy the new site to your production server
- Immediate checks:
- Verify homepage loads correctly
- Test key user paths
- Check analytics tracking is working
- Verify forms send notifications
- Test a few critical redirects
- Monitor closely: Watch analytics, server logs, and user feedback for the first 24-48 hours
- Prepare rollback: Have your team ready to restore the old site if critical issues arise
DNS changes: If changing hosting providers, DNS propagation can take 24-48 hours. Plan accordingly and set a low TTL (time to live) value on your DNS records before the change to speed up propagation.
26. Monitor Post-Launch Performance
Your work doesn’t end at launch. Careful monitoring helps you catch and fix issues quickly while gathering data on the redesign’s impact.
First 24 hours:
- Monitor server uptime and performance
- Watch for error spikes in Google Search Console
- Check analytics for unusual traffic drops
- Review user feedback channels (support tickets, social media)
- Test key conversion paths again on the live site
- Monitor form submissions to ensure they’re coming through
1st week:
- Review all analytics metrics daily
- Check for crawl errors in Search Console
- Monitor page speed on the live site under real traffic
- Review heatmaps to see actual user behavior
- Address any bugs or issues users report
- Monitor search rankings for important keywords
First month:
- Compare traffic and conversion data to the pre-launch baseline
- Identify underperforming pages that need optimization
- Analyze user behavior patterns
- Gather customer feedback through surveys
- Make iterative improvements based on data
Ongoing optimization:
- Continue monitoring core metrics weekly
- Run regular SEO Optimization audits
- Keep testing and improving conversion rates
- Update content regularly
- Stay on top of security updates and backups
27. Announce Your Redesign
Don’t let your hard work go unnoticed. Actively promote your new website to drive traffic and excitement.
Announcement channels:
Email marketing:
- Send announcement to your email marketing list
- Highlight new features and improvements
- Invite feedback on the new design
- Include clear calls-to-action
Social media:
- Create posts across all platforms
- Share before/after comparisons
- Post stories or behind-the-scenes content
- Use relevant hashtags
- Engage with comments and questions
Blog post:
- Write a detailed post about the redesign
- Explain what changed and why
- Thank your team and contributors
- Invite users to explore and provide feedback
Press release: For major redesigns, consider issuing a press release to industry publications and local media.
Customer outreach:
- Notify key clients or customers personally
- Provide any necessary guidance for new features
- Thank them for their patience during the transition
Your announcement generates initial traffic spikes and creates buzz around your improved website.
28. Implement A/B Testing and Continuous Improvement
A website redesign isn’t a one-time project—it’s the beginning of ongoing optimization. A/B testing helps you make data-driven improvements.
Elements to A/B test:
- Headline variations on key pages
- Call-to-action button text and colors
- Form length and field requirements
- Page layouts and content organization
- Images and visual elements
- Navigation structures
- Pricing presentations
A/B testing process:
- Identify a specific element to test
- Create a hypothesis (“Changing the CTA button from green to orange will increase clicks by 15%”)
- Design the variation
- Split traffic between the original and the variation
- Run test until statistical significance is reached
- Implement the winner
- Test another element
Use tools like Google Optimize, Optimizely, or VWO for A/B testing. Focus on one test at a time for clear results, and always let tests run long enough to gather meaningful data.
Continuous optimization means your website keeps improving over time, delivering increasingly better results for your business.
Common Website Redesign Mistakes to Avoid
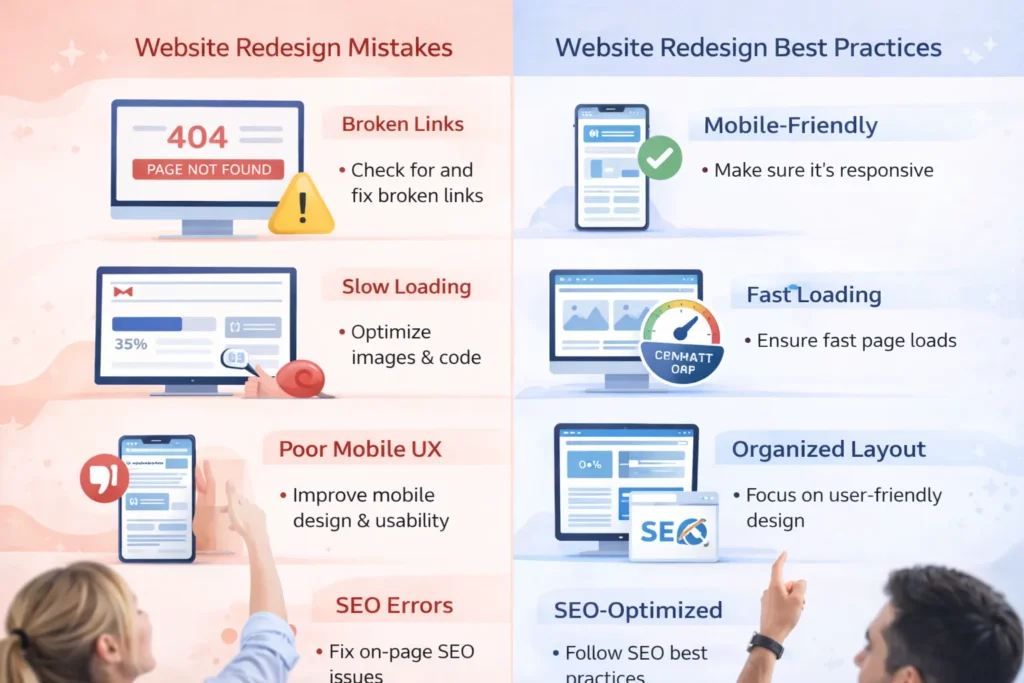
Learning from others’ mistakes saves you time, money, and headaches. Avoid these common redesign pitfalls:
1. Skipping the research phase Jumping straight to design without understanding your audience, competitors, and current site performance leads to decisions based on opinion rather than data.
2. Forgetting about SEO until the end SEO must be considered from the beginning. Treating it as an afterthought results in lost rankings, traffic, and revenue.
3. Not setting up proper redirects Failing to redirect old URLs to new ones is the #1 cause of traffic loss after redesigns. Every changed URL needs a 301 redirect.
4. Deleting valuable content Just because content looks old doesn’t mean it’s not driving traffic and conversions. Check analytics before deleting any pages.
5. Prioritizing aesthetics over functionality Beautiful design means nothing if users can’t complete their goals. Form follows function—ensure usability comes first.
6. Ignoring mobile users With 60%+ of traffic on mobile, a poor mobile experience guarantees failure. Design mobile-first, not as an afterthought.
7. Inadequate testing Launching without thorough testing leads to broken functionality, poor user experiences, and lost business.
8. Not backing up the old site Without a backup, you can’t roll back if something goes catastrophically wrong during or after launch.
9. Changing everything at once Radical changes confuse existing users. Balance improvements with familiarity, especially for established brands.
10. Forgetting to update analytics If tracking isn’t properly set up, you can’t measure success or identify problems.
Final Thoughts
A website redesign is a significant investment of time, money, and resources. When executed strategically with proper planning, it transforms your online presence and delivers measurable business results—increased traffic, higher conversions, and stronger customer relationships.
The key to success is following a comprehensive, methodical approach rather than rushing in reactively. This checklist provides a roadmap covering every critical phase from initial assessment through post-launch optimization.
Remember these essential principles:
- Start with clear goals and metrics so you can measure success
- Preserve your SEO value through proper redirects and technical optimization
- Put users first with accessible, mobile-friendly, conversion-focused design
- Test thoroughly before launching to catch issues early
- Monitor and optimize continuously after launch
Faqs
Most websites benefit from a complete redesign every 2-3 years, with minor updates and refreshes annually. However, the timing depends on your industry, technology changes, and business evolution.
A redesign can hurt SEO if done incorrectly, but proper planning actually improves it. The key is implementing 301 redirects, preserving high-value content, maintaining technical SEO best practices, and improving user experience.
Timelines vary based on size and complexity: small sites (10-20 pages) take 2-4 months, medium sites (50-100 pages) take 4-6 months, and large enterprise sites take 6-12+ months.
A redesign is a complete overhaul of structure, design, and functionality. A refresh involves minor updates like new colors, updated content, or small UX improvements without changing the fundamental architecture.
Costs range from $100-500 for DIY with website builders, $2,000-15,000 for freelancers, $10,000-50,000 for small agencies, and $50,000-250,000+ for enterprise agency projects.
DIY works for small, simple sites if you have time and basic technical skills. Hire professionals for complex sites, e-commerce, custom functionality, or when you lack in-house expertise.
Never delete pages with high traffic, strong backlinks, or good conversion rates without proper 301 redirects. Always check analytics before removing any content.